Incorrectly formatted data is the bane of a project control professionals life.
The start of a project is often a chaotic time. Everyone has competing priorities and the data naming conventions are not always clearly communicated at the start of a project.
Take for instance an example where you are receiving time sheet data from a partner design company. In theory they simply have to send an approved data dump of the actual hours charged to your project very week. You will take the data and add it your Bi-weekly report. It should not be a big deal.
When you get the first report, you open the excel worksheet attachment and your heart drops. The report is correctly formatted but there are a few differences in naming that will make your life difficult.
They have named the engineering specialist groups slightly differently than your budget system. You have less categories that they have. You will have to reduce the granularity of their actual hours to match the budget categories that you have.
Your first reaction is one of anger. Why can these people not get this right. On every project we aim to avoid these time-consuming data differences, but every time they appear.
Luckily for us, Power Query has some great options for getting around these problems. If you are having issues aligning set of data, the powerful and easy to use remapping functions in Power Query can save you a lot of time and make your reports more accurate.
As you have been learning you set the rules for data transformation once and then every time you receive an updated data report, add it to the folder and the data will be formatted and added to your report.
The Problem
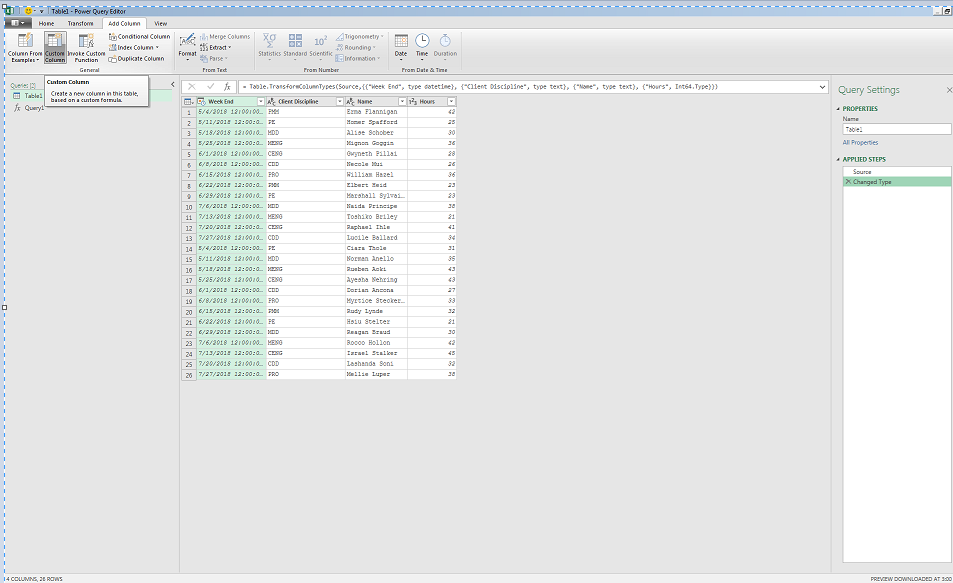
You receive the following report.
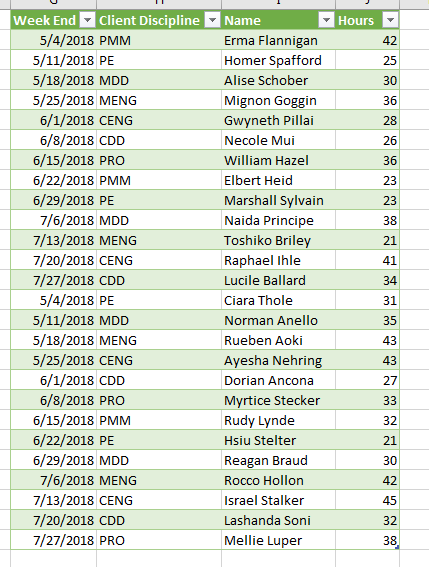
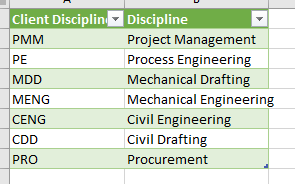
The Client Discipline column contains a code that you want replaced with discipline description that will match your reporting system. You want to replace the Client Discipline codes with your own description as shown in this table.
Power Query will allow you to write a little bit of code that will make that switch for you every time you get an updated report.
This is the excel file this tutorial is based on so you can follow along: Excel Work File
Let’s get Started.
Select the Client data and use the Data tab to click From Table/Range. (Remember you can use any of the get data options in the Data Tab)

Once you are in the Power Query menu you want to create a Function. A Function is a piece of code that allows you to pass data into and out of.
In our case we are passing the Client Discipline codes though a piece of code that will replace each Client Disciple description with a corresponding discipline that matches out system.
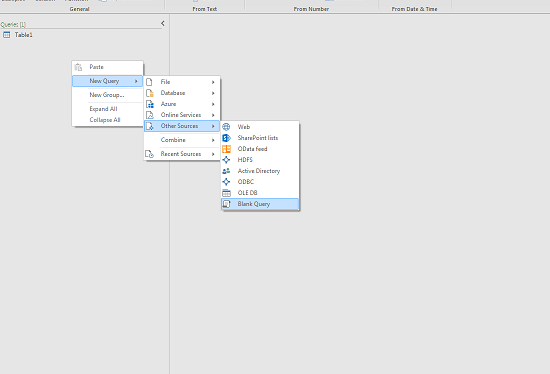
To do this you right click on the left column of the Power Query menu and click New Query – Other Source – Blank Query.
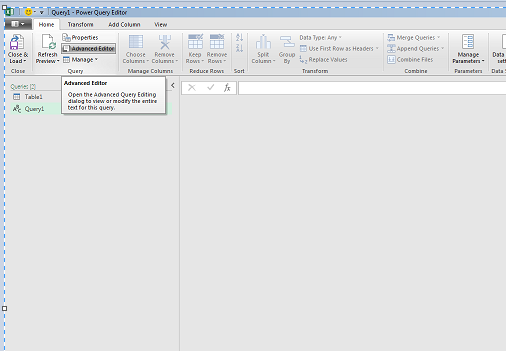
Then click Advanced Editor in the top left corner.
You are now looking at the Power Query Advanced Editor function. Power Query is a graphical interface for a programming language called M. To do this exercise you have to use a little bit of the M language.

We want to paste the following script in to the text area:
(input) =>
let
values = {
{“PE”,”Process Engineering”},
{“MDD”,”Mechanical Drafting”},
{“MENG”,”Mechanical Engineering”},
{“CENG”,”Civil Engineering”},
{“CDD”,”Civil Drafting”},
{“PRO”,”Procurement”},
{“PMM”, “Project Management”},
{input, “Undefined”}
},
Result = List.First(List.Select(values, each _{0}=input)){1}
in
Result
When you press OK you should get the following screen

Now return to Table 1 in the Query options on the left-hand side of the screen.
Click the add Column Tab and select Custom Column.
Call the new column name Discipline. Now you want to pass the Client Discipline column though your function Query1 so that every description code can be successfully retagged. You do this with the following formula. =Query1([Client Discipline])
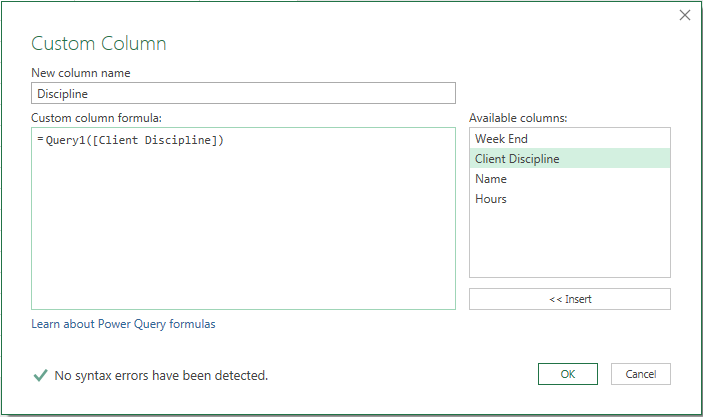
Now click OK an change the Discipline column for undecided format to text.

You are now done. If new Client Discipline descriptions are added later, the query will return Undefined in the Disciple Column and you will have to add that description to the code.
This technique works reliably on large tables and is something that I use all the time.
I hope you find the technique useful.